|
|
ROBO-ROMP (while, for,
if-else) |
|
The C++ programming language had its beginnings as the C programming
language. The "++" part of the
language is rather recent. For CSC126
students, most of what we have learned so far can be implemented in both C and
C++. The only C++ statements we have
actually used are the cout, cin statements, and the //comment
style.
Interactive C (IC)
is a version of the C language that runs on the MIT handy board. We use the handy board to control our Lego
robots. IC does not support the C++
instruction set although in more current versions, the // comment style is
accepted. The IC language is interpreted
rather than compiled. Why might an
interpreter be more useful in controlling a robot? What disadvantages are there in interpreting
source code? Why are these disadvantages
not that significant when controlling a robot?
Start Interactive C.
Notice that as you load IC, all IC libraries are loaded
onto the board. Since all libraries
are already loaded, there is no need to #include
these libraries. Hence, IC does not
support the #include
statement.
One of the nice things about IC is the ability to issue
commands to the robot from the IC command prompt.
Robo-Rap!
If we can't use cout,
then how do we print in IC? IC uses the
standard C print function. To print a
character string in C,
the statement syntax is as follows:
printf("Place your statement here\n");
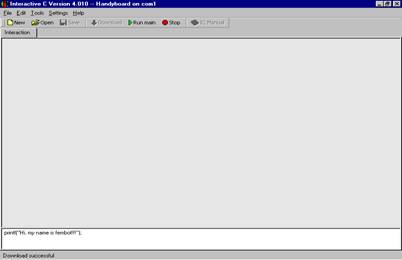
Give your robot a name.
From the command area on the interaction tab, use the printf
statement to say, "Hi, my
name is Roboname". Notice that the statement is printed on the
LCD display of the handy board.
The handy board has rudimentary sound capabilities. It can beep!!
The beep command can also be entered at the command prompt.
In the command space on the interactive tab type in the
command: beep();
Your robot can now talk!!
The beep command produces a 500 Hertz tone for 0.3 seconds.
To hear a continuous beep type: beeper_on( );
To turn the beeper off type: beeper_off( );
IC has a built in sleep
function. The sleep function accepts a
float number as a parameter. This tells
the robot how long to wait, in seconds, before executing the next statement. For example, the statement sleep(1.0);
causes the robot to wait one second.
Note all numbers to the sleep command have to have a decimal point.
All IC programs have a main function, just as in
C++. You can use any editor to create an
IC program. IC version 4.0 has it's own editor. To
enter a new program into IC, click on the New
button on the tools menu. The
editor tab appears.
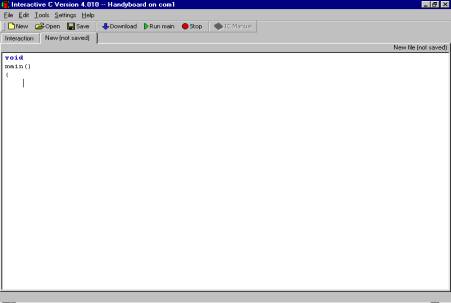
There are no #include statements in IC. Therefore an IC program has the general form:
void
main( )
{
//comments
statements;
}
Write an IC program that will beep, wait 1 second, beep
again, wait one second, and then beep again.
Save this program. To save a program the first time, click on File
and then Save As
from the menu bar. After the first time you can click on the Save button. IC saves the program with a
.ic extension. DO NOT save the file as a .cpp file.
To run your program:
- Click
on the download button. This loads your program onto the handy
board.
- Click
on the run main button to
execute.
- If
you need to stop execution of a program, while it is still running, click
on the stop button.
- To
execute the program again either click on the run main button, or turn on the robot off and then on
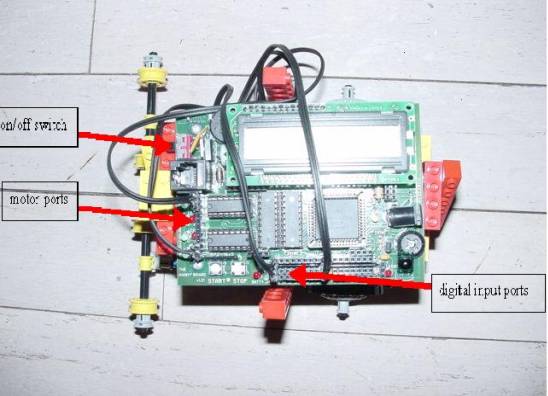
again. The on/off switch is on the
side of the handy board. Refer to
the labeled picture below for the exact location. Note the handy board beeps when it is
turned on so you may hear an additional beep in the beginning of your
program.
Modify your program, using a for loop, so that the robot beeps 20 times. Demonstrate to your instructor so that he/she
can initialize your robot check off the Robo-Evaluation
Sheet.
Tickle Me Robot!!
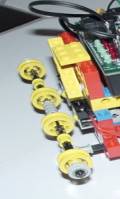
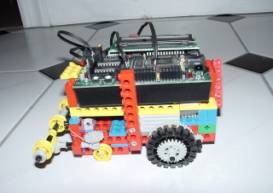
Above is a picture of the robot's "touch
bumper". When the bumper is pushed
in, the yellow pulleys in the center will depress the touch sensor on the
robot's body. The touch sensors are
connected into the handy board via the digital ports. Looking at the picture of the handy board
below, the digital ports are located on the bottom of the board and are
numbered 7 - 15. In this picture, the
touch sensors are plugged into port 15, all the way to the left, and port 7 in
the center. The input ports 0 - 6, are
analog ports and we will not be using them for this lab.
IC has a built-in function that will read if the digital
input port is receiving a signal. The
function is boolean and returns a 1 if there is a
signal, and 0 if not. The parameter for
the function is the number of the digital port to be read. Make sure your touch sensors are plugged
into digital ports 15 and 7 as in the above picture.
Click on the interactive tab. In the command area type: digital(15);
Now push the bumper in, keep it depressed, and type: digital(15);
What were the values returned by the digital function in
each case?
Let's combine all that we have learned into our first
"real" Robo-program!! First
unload the beep program by closing it.
Click on the beep program tab.
Click on File, then Close from the menu bar.
Write an IC program that will:
- Continuously
(infinite while loop) read digital ports 15 and 7.
- If
the right sensor is depressed, we print to the LCD display the
message:
Hee! Hee! You tickled my right side!!!
The robot waits 1 second before
testing again.
- If
the left sensor is depressed, we print to the LCD display the
message:
Hee! Hee! You tickled my left side!!!
The robot waits 1 second before
testing again.
- Save
your program
- Run
the program. When it works show the
instructor so that he/she can initial your Robo-Evaluation
Sheet.
You may have to experiment to
find out which digital input is connected to the sensor on the left and which
digital input is connected to the touch sensor on the left.
Robo-Rumba!!!
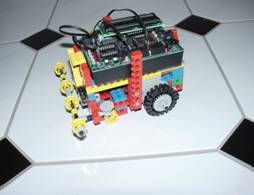
How can we make your robot a "mobile" robot ?
There are two motors on your robot. One controls the left wheel, the other the
right wheel. Each motor is plugged into a
motor port on the handy board (see the labeled picture above). The motor ports are numbered from 0 to
3. The motors in the picture are plugged
into motor ports 0 and 3. Make sure your
motors are also plugged into motor ports 0 and 3.
The command to move the wheel plugged into port 0 forward
is:
fd(0);
The command to move the wheel plugged into port 3 forward
is:
fd(3);
To turn motor 0 off the command is:
off(0);
To turn all the motors off the command is:
ao( );
Write an IC program that will move your robot forward for
3 seconds and then stop. The forward
commands are persistent. The robot will
move until the ao() or off()
command is executed. The sleep command
is needed after the forward commands so that there is some time between the
execution of the forward command and the off command. The sleep command can be thought of as a
"busy wait" command.
To make the robot turn right, turn the motor on that
controls the left wheel while keeping the right motor off. Do the opposite to turn left.
Write an IC program that will have the handy bug
continuously (while loop):
- turn
45o right
- go
straight for 3 seconds
- turn
45o left
- go
straight for 3 seconds
- then
right …
- Unplug
your robot from the computer. To
execute your program, turn the board off and then on. To stop the robot, catch it and turn it
off!! Demonstrate and have your
instructor initialize your Robo-Evaluation Sheet
To rotate the motor in the opposite direction causing the
robot to move backwards, the command is:
bk(0);
bk(3);
Where 0 and 3 refer the motor ports.
Write an IC program that will have the handy bug
continuously (while loop);
- move
right 45o for 2 second
- move
left 45o for 2 second
- stop
for .5 seconds
- Do
steps 1-2 in reverse.
- Demonstrate
and have your instructor initialize your Robo-Evaluation
Sheet
Robo-Ruckus!!!!
Now we will write an IC program that will use all that we
have learned. We are now going to
program the robot to avoid obstacles.
Write an IC program that will have the handy bug
continuously:
- Move
forward until it touches an object.
- If
the right touch sensor fires, have the robot move backwards .5 seconds and
then turn 90 o left, then proceed forward.
- If
the left touch sensor fires, have the robot move backwards .5 seconds and
then turn 90 o right then proceed
forward.
- The
handy bug beeps as it moves forward!
- Demonstrate
and have your instructor initialize your Robo-Evaluation
Sheet
HAVE FUN!!!!!!
Written by Dr. Susan Imberman
Copyright ã November 2004, All rights reserved.