|
|
ROBO-ROMP (while, for,
if-else) |
|
The C++ programming language had its beginnings as the C programming
language. The "++" part of the
language is rather recent. For CSC126
students, most of what we have learned so far can be implemented in both C and
C++. The only C++ statements we have
actually used are the cout, cin statements, and the //comment
style.
Robot C (RC) is a version of the C
language that runs on the Lego Mindstorms NXT robot. We use the NXT brick to control our Lego
robots. RC does not support all of the
C++ instruction set. To use all the RC
instructions and libraries we need to download these onto the NXT brick. Click on the hyperlink below to get the
instructions on how to download the RC firmware onto the NXT brick. The Robot C website has many video tutorials
on how to work with the NXT brick.
To see the video on how to
download firmware CLICK
HERE Then click on the Setup Button,
NXT Setup, and then choose the Download Firmware video.
Now download the Robot C firmware onto your NXT.
Download
and print the robocheckoff sheet by clicking here.
Robot C comes with many sample programs.
Let's open one and download it into our robot. WATCH the Download Sample Program video. Download and run the MotorCForward.c
program. MAKE SURE YOUR ROBOT IS ON THE
FLOOR WHEN YOU RUN THE PROGRAM!!!!!
Let's look at the code in this program a little closer.
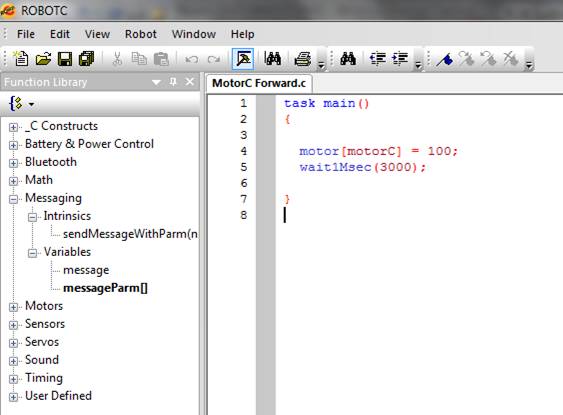
The left pain in the Robot C IDE (interactive development environment)
contains a list of the basic Robot C program commands. The right hand pane contains the program
listing. Notice that the data type of
the main program is a task. This
is a user defined data type used only for the NXT brick. We will learn in a later computer science
class how to define our own data types.
The motor array controls the NXT motors.
The array position, motorC gets assigned a value of 100. The range of values for the motors, is from
-100 to 100. Negative values run the
motors in reverse, positive values run the motors forward and a value of 0 will
stop the motor. If you look at the top
of your robot, you will notice that the motors are plugged into motor ports B
and C. The motor command is persistent. That means it continues to execute until we
tell it to stop or the program ends, whichever comes first.
The wait1Msec function waits the
integer parameter multiplied by 1 millisecond amount of time before proceeding
to the next statement. For this program
the motor command executes for 3 seconds.
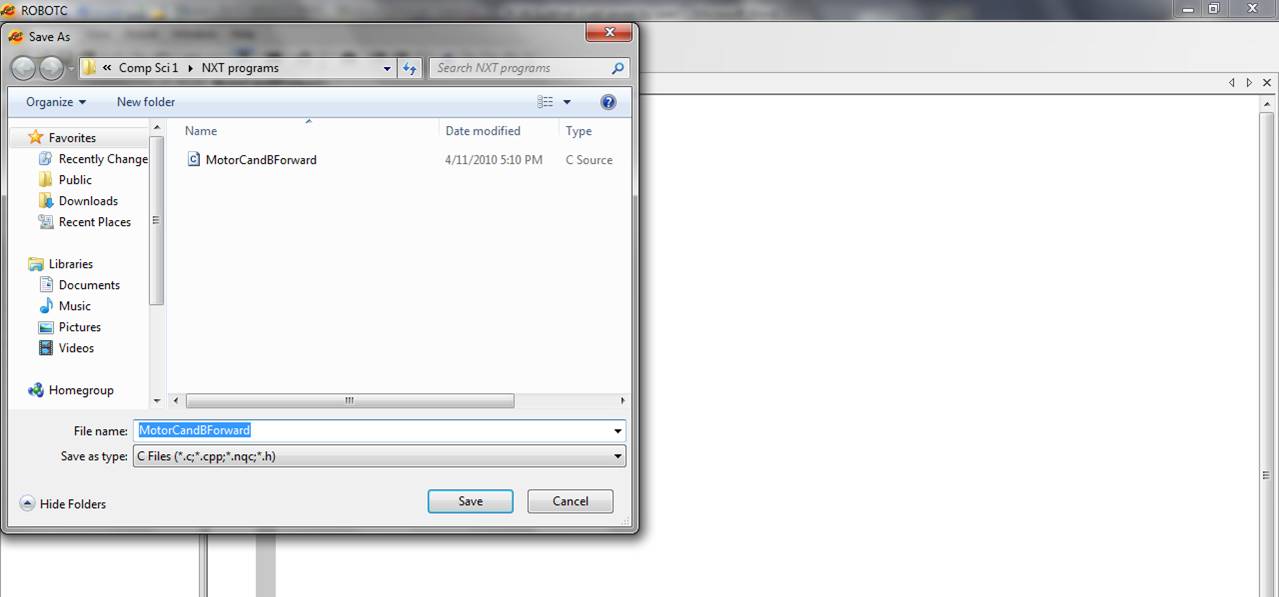
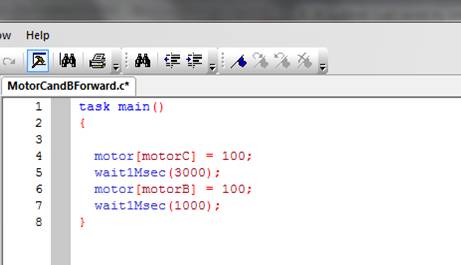
Save the MotorCForward.c program as MotorCandBForward.C RC saves the programs with a .c extension. DO NOT save the file as a .cpp file.
Modify the program so that your program contains the same code as below.
What behavior do
you expect your robot to exhibit? What
did your robot do? How can you explain
what happened?
Modify your
program so that it twirls in a forward direction clockwise for 2 second, stops
for about a half second (this allows the motors to catch up with the processor)
and then twirls counter clockwise for 2 seconds. (Hint:
remember a value of 0 will stop the motor.
Demonstrate your
program to the instructor so that they can initial your robocheckoff sheet.
Robo-Rumba!!!
To make the robot turn right, the motor that controls the left wheel runs
while the right motor is off. . Do the
opposite to turn left. If you slow the
robot down by adjusting the power to the motor, you have much more control over
how your robot moves
Write an RC program that will have the NXT robot
continuously (while loop) -
- turn
45o right
- go
straight for 3 seconds
- turn
45o left
- go
straight for 3 seconds
- then
right …
- In
essence your robot will move forward in a zig zag pattern
Once you have this working modify your program so that the NXT root will continuously (while
loop) -
- turn
45o right
- go
straight for 3 seconds
- turn
45o left
- go
straight for 3 seconds
- does
the above backwards.
Your robot has learned to rumba ;-))))
Demonstrate and have your instructor initialize your
robocheckoff sheet
Robo-Rap!
If we can't use cout,
then how do we print in RC? Where do we
print to???
The NXT brick has an eight line LCD screen. The nxtDisplayCenteredTextLine(nLineNumber, sString); statement contains the funciion nxtDisplayCenteredTextLine( ); The function takes two parameters. The first parameter specifies the line number
at which printing will start, and the second parameter, sString, is the
character string that will get printed.
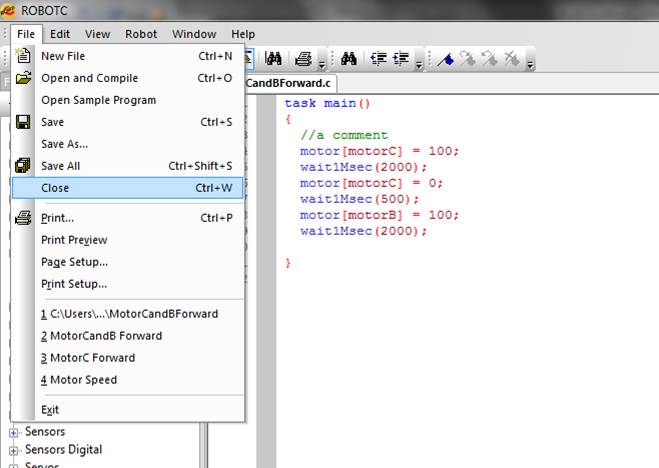
Close the
MotorCandBForward.c program
Open a new
file.
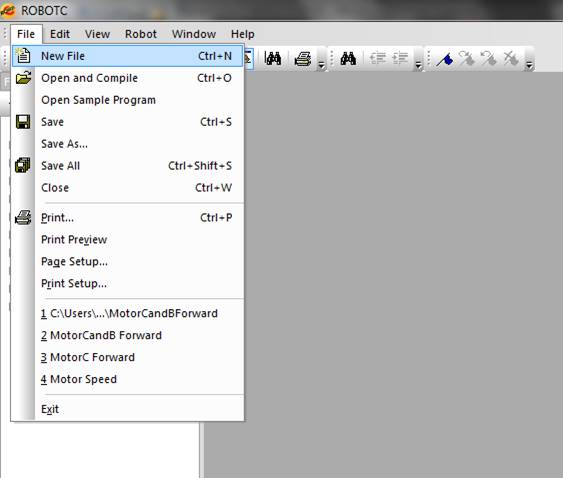
Save the
file as roborap.c.
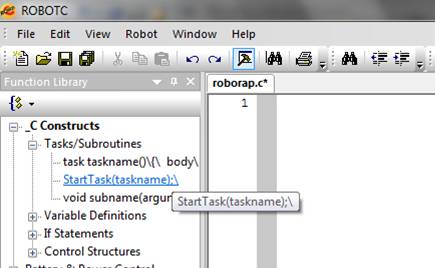
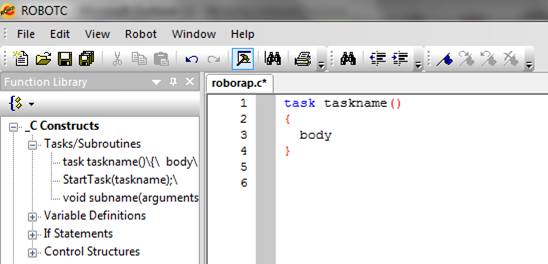
One of the
nice things about the Robot C IDE is that the statement templates can be
dragged from the functions library to the program editor. Expand the C Constructs and Tasks/Subroutines
sub menus. Drag the task
taskname()\{\body template into the editor
Your program
should look like this:
Edit the
text so that you program appears as so.
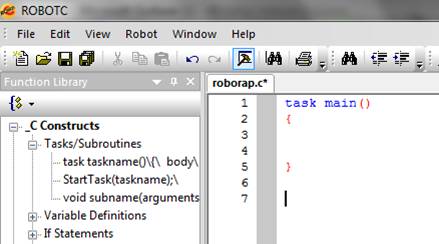
Decide on a name for your robot. Modify the body of your main function to use
the display the statement "Hi, my name is Roboname" on
lines 3 and 4 of the LCD display. Use
the nxtDisplayCenteredTextLine(nLineNumber, sString); statement.
You need to follow the statement with the wait1Msec command so the brick
has time to display the text before the program ends.
The NXT brick has
sound capabilities. It can beep!!
Add the statement PlaySound(soundBeepBeep); followed by a 1 second wait.
Modify the RC program that will "BeepBeep",
wait 1 second, "BeepBeep" again, wait one second, and then
"BeepBeep" again.
Modify your program, using a for loop, so that after the robot
displays its name, it will "BeepBeep" 10 times. Demonstrate to your instructor so that he/she
can initialize your robocheckoff sheet.
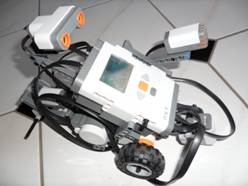
Tickle Me Robot!!
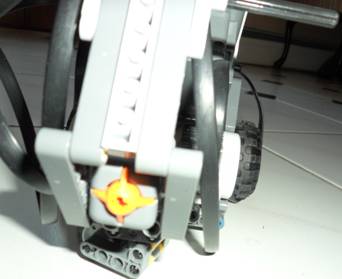
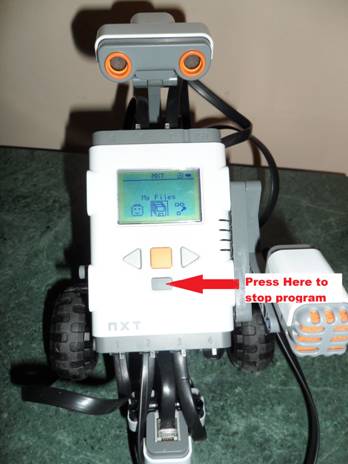
Above is a picture of the robot's "touch
bumper". The touch sensor is
connected into NXT brick sensor port 1 (S1).
RC has a built-in function that will read the sensor port's value.
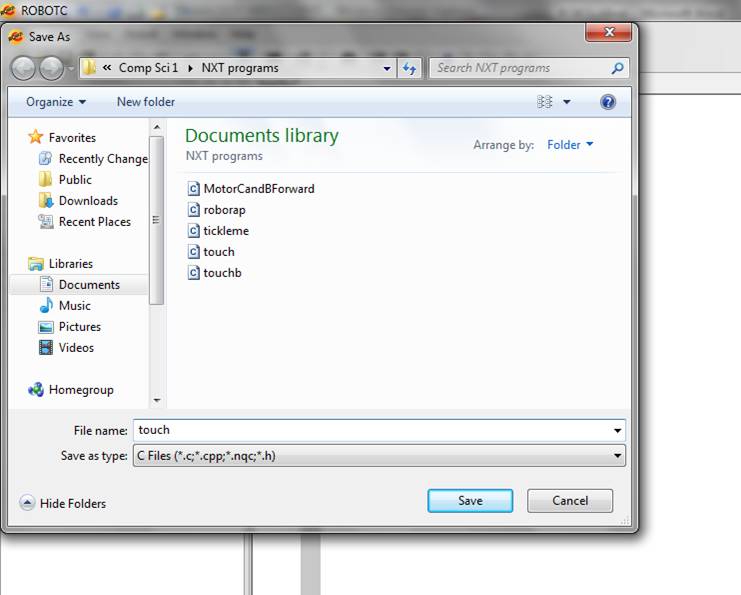
Close the Roborap program and open a new file. Call this program touch.c
In order to use the touch bumper on your NXT robot, we
must configure the sensor. To do this:
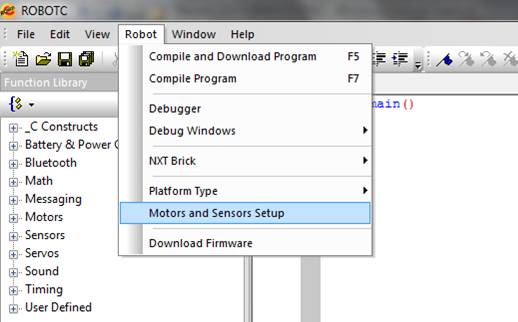
1.
Click on Robot
then on Motor and Sensors Setup
2.
Select the Sensors tab
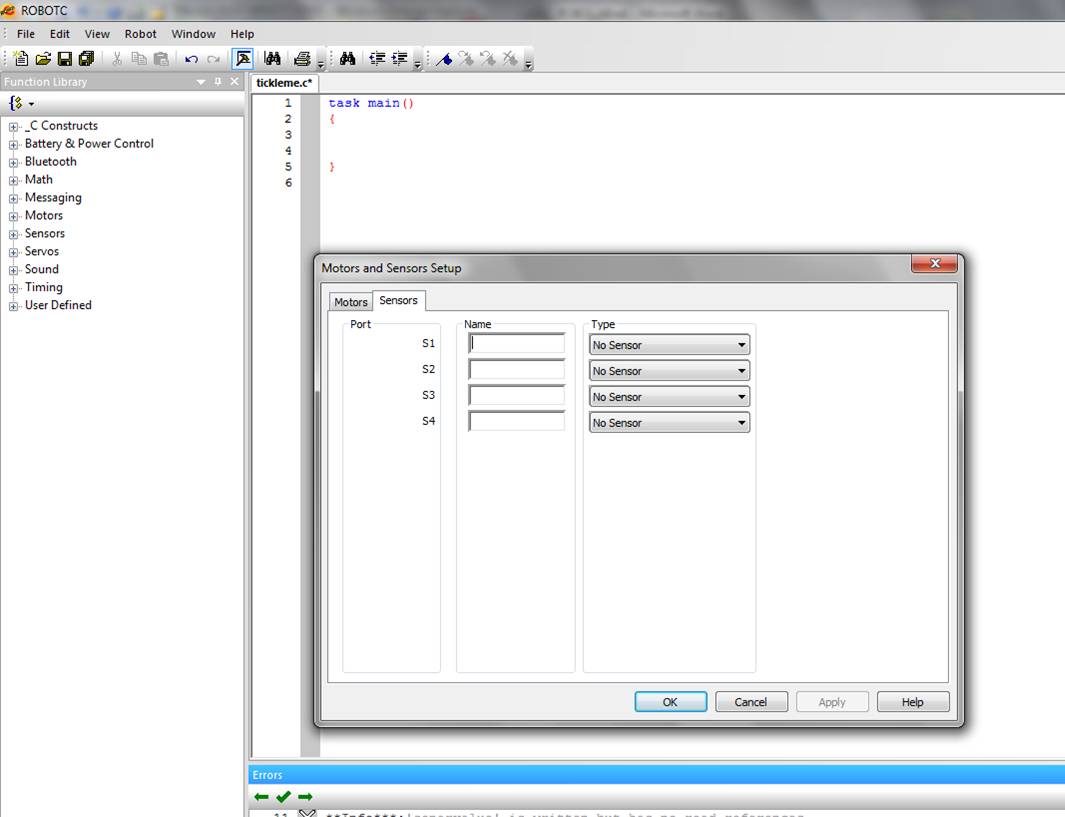
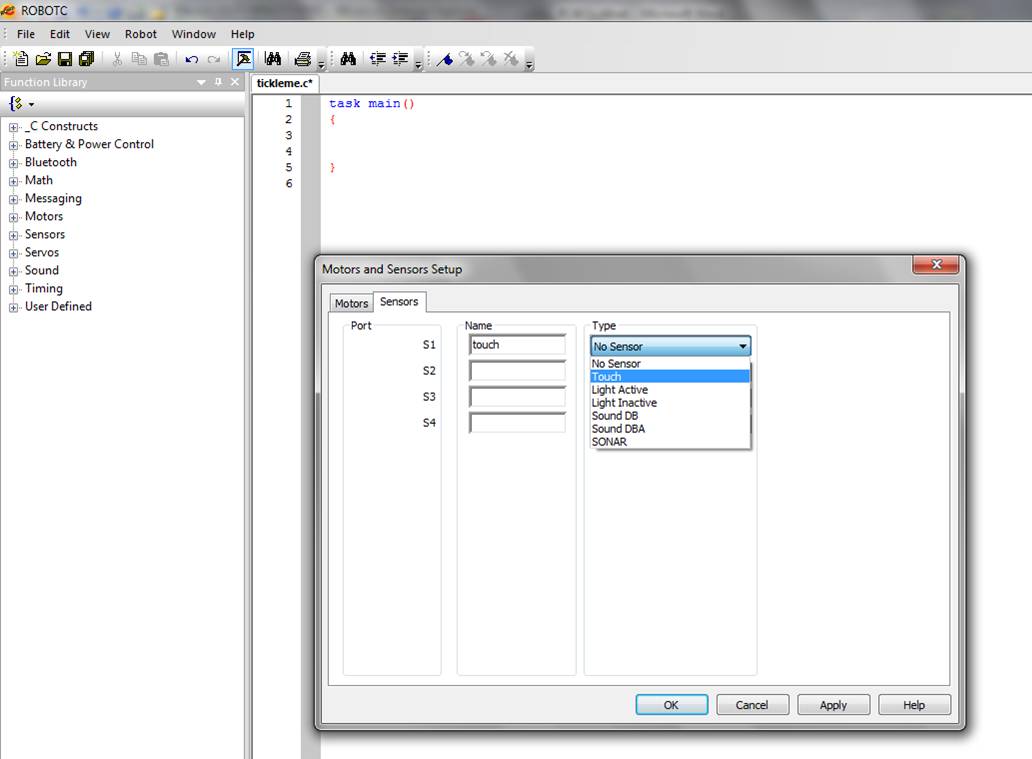
Our touch sensor is attached to sensor port 1 (S1). We will call the sensor touch. Type this into the box next to S1. Select from the touch type from the drop down
menu.
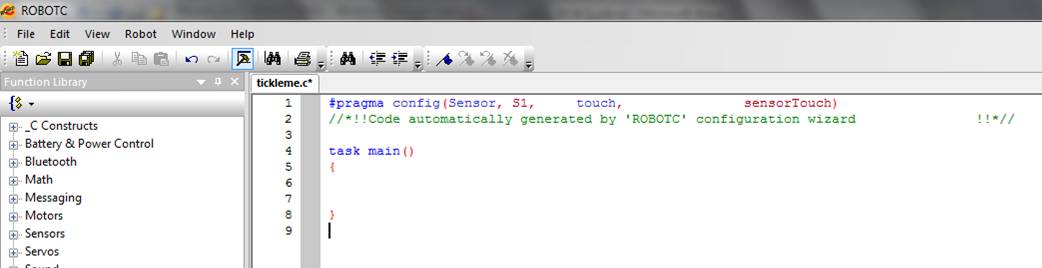
Click on OK to save this sensor information. Notice that by doing this, code is automatically
generated by the Robot C configuration wizard and placed at the top of your
program.
The SensorValue()function
returns the value of the current sensor reading. Touch sensors are digital and thus return
either a value of 0 when not depressed and a value of 1 when they are
depressed.
Modify your program to include the following code:
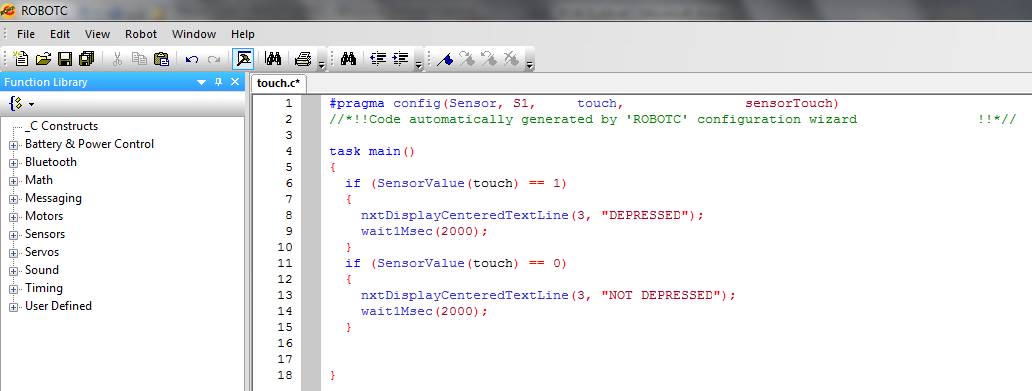
Now push the bumper in
and, keep it depressed. Run the program.
What was displayed in the LCD window?
Now don't push the bumper in and keep it depressed. Run
the program. What was displayed in the
LCD window?
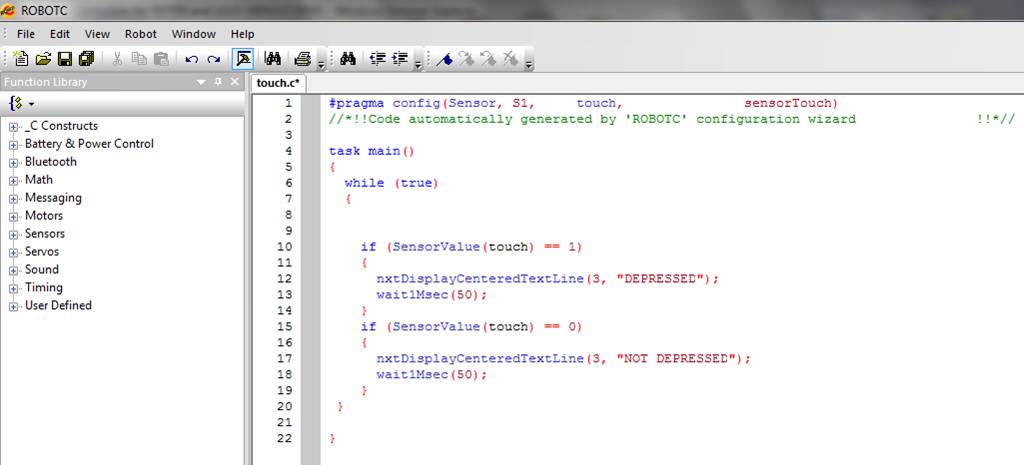
If we want to test the bumper while the program
continuously runs, enclose your code inside a while loop. This is when an infinite loop is a good
thing!!
To stop a running NXT program, if the robot is tethered
to the computer, you can click on the stop box in the debug window. If the robot is not tethered, you can stop a
program by pressing the rectangular grey button. Notice we have lowered the wait time to 50
milliseconds. Why?
The ultrasonic sensor sends out a sound wave and then
calculates the time it takes for the sound to bounce back. This works in the same way as a bat or a
submarine's sonar. The sensor measures
distance in centimeters. Thus if the
SensorValue is 25, that means that the object is 25 centimeters away. Let's modify our program to read from the
ultrasonic sensor. Save your program as
ultrasonic.c.
We are now going to work with the ultrasonic sensor. To watch the video about the sensor CLICK
HERE. Click on the sensing button,
and then select the Wall Detection (Ultrasonic) video.
Obviously, we have to configure our ultrasonic
sensor. Open the Motors and Sensors
Setup Window. Our ultrasonic sensor is
plugged into sensor port 4 (S4).
Configure the sensor appropriately and click on OK.
Change the code so that when the robot detects something
closer than 25 centimeters, it prints the statement, "Too
Close". If something is greater
than or equal to 25 centimenters it prints the statement, "Far
Enough".
Let's combine all that we have learned into our first
"real" Robo-program!! Close
the ultrasonic program and open a new file.
Save this program as tickle.c
Write an RC program that will:
- Continuously
(infinite while loop) read the touch and ultrasonic sensors
- If
the touch sensor is pressed, we print to the LCD display the message:
Hee!
Hee!
You
tickled me!!!
The robot waits 1 second before
proceeding to the next instruction.
- If
the ultrasonic sensor reads less than 25, we print to the LCD display the
message:
Please
don't
Tickle
me!!!
The robot waits 1 second before
proceeding to the next instruction.
- Save
your program.
- Run
the program. Now you have to be
pretty sneaky to tickle your robot!!
- When
it works show the instructor so that he/she can initial your robocheckoff
sheet.
Robo-Ruckus!!!!
Now we will write an RC program that will use all that we
have learned. We are now going to
program the robot to avoid obstacles.
Close the tickle program and open a new file and save it as ruckus.c.
Write an RC program that will have the NXT robot
continuously:
- Move
forward until it senses an object is within 25 cm.
- If
this is true, have the robot move
backwards for half a second, turn right about 45 degrees and then continue
to move backwards..
- The
NXT robot beeps as it moves backward!
It DOES NOT beep when it moves forward.
- Move
backward until the touch sensor is depressed.
- If
this is true, have the robot move
forwards for half a second, turn right about 45 degrees and then continue
to move forwards..
- Keep
the motor power at 50% so the robot doesn't move too fast.
- Demonstrate
and have your instructor initialize your robocheckoff sheet.
HAVE FUN!!!!!!
Written by Dr. Susan P. Imberman
Copyright ã April 2010, All rights
reserved.